Hi folks,
We are going to play GMT Game's The Napoleonic Wars, which is one of my ALL TIME favorite boardgames of this period. Just a great multiplayer strategic game.
We will be playing with 4 players which is probabily the best combo. One player is France, another Britain, another Russian and another Austria. Prussia could be played by a human, but will be a Proxy for our game.
My friend Peter Anderson wrote up a nice report on my Vauban's Wars rules:
http://blundersonthedanube.blogspot.com/2011/05/siege-of-mantua-1796-97-vaubans-wars.html
Drop by and take a look!
Eric
Monday, May 16, 2011
Saturday, May 14, 2011
Guns of Liberty: Battle of McCaskill's Farm
Hi all!
About two weeks ago, Bob McCaskill hosted a Guns of Liberty game that I ran for the local lads.
The game was an introduction for most of the players as only a few had played my rules before.
We were playtesting some minor 3.0 version tweaks to the rules and just had a great time.
The British were on the attack in this fictional Southern Campaign battle. Bob has a spectacular collection of 25mm AWI figures with GMB flags.

The Battle of McCaskill's Farm
Deployment
The battlefield was broken into two fighting locations, with a large wood covered ridge in between the two sections. Players could move units, via trails, through the woods to the other side to help if they deemed it worthwhile. The British are favored to win in this battle, and the American's goal is to bloody the British before withdrawing.
British OOB
I've posted graphics of the Guns of Liberty rosters for those familiar and not familiar with the rules to see how unit ratings are done.
Left Flank (click to enlarge) - Joe commanded the 1st Brigade, and Jim the 2nd Brigade.

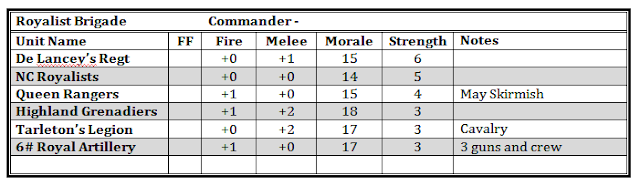
Right Flank (click to enlarge) - Royalist Brigade commanded by Dr. Bob.
American OOB
American Left Flank (facing the Royalist Brigade) - Commanded by Mike

American Right Flank - 1st Brigade lead by Leo and 2nd Brigade by Tim.

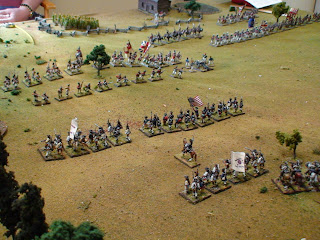
View from the British Right Flank

View from the British Left Flank

Great shot of De Lancey's regiment with the NC Royalists to their right

33rd Foot advancing

Delaware Regiment (3 stands) awaiting the British attack as a reserve unit

Initial Attack
The British plan was simple, advance on all fronts and punish the American rebels!
The British players deployed their units in Open Order line formation for the attack, with the converged Lights pushing forward on the right in skirmish formation.
View of the British attack on the left flank

View of the Royalist Brigade, Queen's Rangers deployed in skirmish on the right to counter the American riflemen behind the fence.


In the middle Joe's brigade of Grenadiers, Lights, and the 33rd advance forward, while Leo's bridage, moves to meet them.
Tim's American bridage "advances to the rear" to gain cover of the rail fence and await the assault by Jim's 2nd Brigade and the dreaded 1/71st Highlanders.

The Royalist Brigade screened on their right by the Queen's Rangers drives the rebels backwards.

Just before the point of impact

Meanwhile on the British left flank the 1st Brigade smashes into the Continentals (North Carolinians, and Marylanders).


In the thick of it! Love thos GMB flags!

British Lights had fallen back after drawing the Continental's first, and most effective, volley. Then the Grenadiers and 33rd are sent in to finish off the Americans

De Lancey's regiment drives Lee's light infantry back

Queen's Rangers form into Open Order and charge the riflemen! The riflemen are forced to retire and the rangers take the ground.

American light infantry in skirmish formation try to inflict some casualties on the large Highland regiment. They are not very successful.

The small 1st Delaware Regiment is forced to retreat by effective British musket fire.

Good view of the action across the entire right flank of the American line.


Dr. Bob's Royalist Brigade continues to punish the rabble driving them back from the fence line.

Leo's Continentals give the British a taste of their own medicine and this turns into a see-saw battle with muskets blazing!

NC Royalist regiment clears the fence and steam-rolls into the North Carolina and Virginia milita.

The Royalist Brigade is now completely engaged!

And victorious! The militia are routing, the American 3# guns are silenced, and this flank is well in hand.

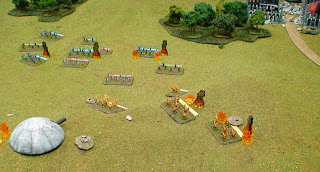
British 63rd Foot overruns the American guns! Disaster for the Americans!

Dr. Bob, knowing his section of the battlefield was secure, sends Tarleton's Legion through the woods to attack Leo's left flank. This was the end for the Americans.

About two weeks ago, Bob McCaskill hosted a Guns of Liberty game that I ran for the local lads.
The game was an introduction for most of the players as only a few had played my rules before.
We were playtesting some minor 3.0 version tweaks to the rules and just had a great time.
The British were on the attack in this fictional Southern Campaign battle. Bob has a spectacular collection of 25mm AWI figures with GMB flags.

The Battle of McCaskill's Farm
Deployment
The battlefield was broken into two fighting locations, with a large wood covered ridge in between the two sections. Players could move units, via trails, through the woods to the other side to help if they deemed it worthwhile. The British are favored to win in this battle, and the American's goal is to bloody the British before withdrawing.
British OOB
I've posted graphics of the Guns of Liberty rosters for those familiar and not familiar with the rules to see how unit ratings are done.
Left Flank (click to enlarge) - Joe commanded the 1st Brigade, and Jim the 2nd Brigade.

Right Flank (click to enlarge) - Royalist Brigade commanded by Dr. Bob.

American OOB
American Left Flank (facing the Royalist Brigade) - Commanded by Mike

American Right Flank - 1st Brigade lead by Leo and 2nd Brigade by Tim.

View from the British Right Flank

View from the British Left Flank

Great shot of De Lancey's regiment with the NC Royalists to their right

33rd Foot advancing

Delaware Regiment (3 stands) awaiting the British attack as a reserve unit

Initial Attack
The British plan was simple, advance on all fronts and punish the American rebels!
The British players deployed their units in Open Order line formation for the attack, with the converged Lights pushing forward on the right in skirmish formation.
View of the British attack on the left flank

View of the Royalist Brigade, Queen's Rangers deployed in skirmish on the right to counter the American riflemen behind the fence.

The American Left flank showing the rifles far left of the line on the fence and Lee's Legion Light infantry on the far right in skirmish formation. The rest fo the militia was held in reserve.

In the middle Joe's brigade of Grenadiers, Lights, and the 33rd advance forward, while Leo's bridage, moves to meet them.

Tim's American bridage "advances to the rear" to gain cover of the rail fence and await the assault by Jim's 2nd Brigade and the dreaded 1/71st Highlanders.

The Royalist Brigade screened on their right by the Queen's Rangers drives the rebels backwards.

Just before the point of impact

Meanwhile on the British left flank the 1st Brigade smashes into the Continentals (North Carolinians, and Marylanders).


In the thick of it! Love thos GMB flags!

British Lights had fallen back after drawing the Continental's first, and most effective, volley. Then the Grenadiers and 33rd are sent in to finish off the Americans

De Lancey's regiment drives Lee's light infantry back

Queen's Rangers form into Open Order and charge the riflemen! The riflemen are forced to retire and the rangers take the ground.

American light infantry in skirmish formation try to inflict some casualties on the large Highland regiment. They are not very successful.

The small 1st Delaware Regiment is forced to retreat by effective British musket fire.

Good view of the action across the entire right flank of the American line.

Another view

Dr. Bob's Royalist Brigade continues to punish the rabble driving them back from the fence line.

Leo's Continentals give the British a taste of their own medicine and this turns into a see-saw battle with muskets blazing!

NC Royalist regiment clears the fence and steam-rolls into the North Carolina and Virginia milita.

The Royalist Brigade is now completely engaged!

And victorious! The militia are routing, the American 3# guns are silenced, and this flank is well in hand.

British 63rd Foot overruns the American guns! Disaster for the Americans!

Dr. Bob, knowing his section of the battlefield was secure, sends Tarleton's Legion through the woods to attack Leo's left flank. This was the end for the Americans.

Well, the Americans were routing on their left flank and had to withdraw on the right after taking a pretty heavy beating along with Tarleton riding down their flank and then pursuing. It would be a hazardous retreat for the Americans.
We had a really good time and kudos to Dr. Bob for hosting the game and I thought he played the game extremely well.
Cheers!
Thursday, May 5, 2011
Projects for 2011
This is my first attempt at keeping track of my projects for a year. I hope it makes me more productive.
Latest Update: June 6th (10 more flocked SYW Austrian units! 90% flocked now)
I'm going to use some color coding with percentages:
0 - 20% complete
21 - 49% complete
50 - 75% complete
76 - 99% complete
100% complete
Wargaming Rules
Write Din of Battle 2nd Edition for Piquet Inc.: 100%
Write Vauban's Wars for Piquet Inc.: 85%
Write version 3.0 of Guns of Liberty: 50%
Write Epic FOB based on Field of Battle WW2: 50%
Wargaming Miniatures
Late 18th Century Armies
Paint Russian Infantry Units (1 of 4): 25%
Flock all Russian Units (4 of 30): 5%
Paint Polish Infantry Units (x of x): 0%
Paint Polish Cavalry Units (x of x): 0%
Flock all Polish Units (x of x): 0%
Paint Ottoman Cavalry Units (x of x): 0%
Paint Ottoman Infantry Units (x of x): 0%
Paint Ottoman Artillery Units (x of x): 0%
Flock all Ottoman Units (x of x): 0%
Flock all Austrian Units (x of x): 0%
Label all Austrian Units (x of x): 0%
Seven Years War Armies
Flock all French Units (37 of 37): 100%
Flock all Austrian Units (66 of 66): 100%
Paint Remaining Prussian Infantry Units (x of x): 0%
Flock all Prussian Units (9 of 32): 25%
Epic Sci-Fi Armies
Rebase all Eldar: 100%
Rebase all Imperial Guard: 80%
Rebase all Space Marines: 100%
Paint New Eldar Units: 0%
Paint New Space Marine Units: 0%
Russo-Japanese War Armies
Flesh Touch-up on all Japanese Units (x of x): 0%
Flock All Japanese Units (x of x): 0%
Siege Warfare Armies
Paint Siege Guns: 0%
Flock Siege Guns: 0%
Paint Commanders: 0%
Flock Commanders: 0%
Wargaming Terrain
Finish making Parallel trenches: 80%
Finish making Gun Enplacements:
Base and Terrain Viking Villages: Buildings assembled
Base and Terrain Medieval Towns: Buildings assembled
Base and Terrain Epic Buildings: 15%
Sunday, May 1, 2011
Eldar Stopped Cold on Vornex IV
In my continuing attempt to playtest new FOBWW2v2 and my conversion of Epic 40k to FoB, we played another game Wednesday night.
1. No drift for off-board indirect fire. (Worked perfectly)
2. We used Asset desks for calling in assets. (FANTASTIC!)
3. No templates (just a D4 distance from the unit targeted), and this too worked great!
4. Defenders in town areas may choose to retreat suppressed if they want rather than hold their town section suppressed. This also worked great.
5. Close Assault in town that would not have ended, because the defender never has to leave, ends in exhaustion if the defender is pushed back 3 or more inches. Attackers then move into the town section with the defender. (Worked great!)
6. Off-Board counterbattery! This mechanic worked great. An artillery asset (Medium, or Heavy) can fire counter-battery. Roll the CC die of the asset vs a D8. If you win, you reduce the enemy’s asset points by 1.

On the Ultramarine left flank armored companies remain in reserve, while Devastators defend the city, next to the Administration Center.

A battalion of Ultramarine Terminators are hunkered down in the Administration Center.

Shields up! Ion Cannon in rotating turret has two plasma shields up! Eldar Falcon Grav tanks loaded with Guardians in the distance.

In reserve, the Space Marines have a 3 company Assault Battalion.


The plasma missile tears into the Ion Cannon knocking out both shields and inflicting one hit on the structure! So much for my lovely Ion Cannon!


Using the large hill as cover, Brian advances his entire host into striking position...

Mike sends in his Swooping Hawks into the teeth of death!


Great shot of the dual between Ultramarine Devastators and Eldar Dreadnoughts and Bright lances.

Devastators start to take some loses, but manage to drive off both the Bright Lance company and Dreadnoughts.

Exarchs are pushed back with heavy loses, and even lose one company.


Exarchs rally and push in again. You can see a second hit marker on the Ion Cannon now.


Here you can see how badly the Eldar were chewed up. Brian lost nearly every unit attacking my city from Land Raider and Devastator fire. He figured he would lose some, but not everything!

Exachs exact revenge and finally destroy the Ion Cannon, but the cost was tremendous.

My Tactical Marines on the right flank can't stop the Eldar attack and are slowly being pushed back in the city!

Ultramarine off-board artilery strikes a Guardian unit on the right flank!

The Eldar are going to regroup (bring new troops in and rotate some exhausted troops out) and attack again next week. We are learning a lot about tactics and strategies around off-board support, movement, and general game mechanics. We are still new to FoB so each game is a learning experience.
Some things we tried out last night based on conversations here on the list.
1. No drift for off-board indirect fire. (Worked perfectly)
2. We used Asset desks for calling in assets. (FANTASTIC!)
3. No templates (just a D4 distance from the unit targeted), and this too worked great!
4. Defenders in town areas may choose to retreat suppressed if they want rather than hold their town section suppressed. This also worked great.
5. Close Assault in town that would not have ended, because the defender never has to leave, ends in exhaustion if the defender is pushed back 3 or more inches. Attackers then move into the town section with the defender. (Worked great!)
6. Off-Board counterbattery! This mechanic worked great. An artillery asset (Medium, or Heavy) can fire counter-battery. Roll the CC die of the asset vs a D8. If you win, you reduce the enemy’s asset points by 1.
Game Objective: Eldar to take the Space Marine Administration Center (large building with golden roof) The Administration Center was protected by an Ion Cannon. Our first attempt to add in units with shields to the game. The Ion Cannon had a 12+1 combat die, and D10 defensive die.
Eric played the Ultramarines, while Brian and Mike attacked with the Eldar. The game was very large in that there were 35 Eldar units, and 22 Ultramarine units on the table.
Space Marine Tactical Battalion (Mechanized) deployed in small city near the river on the Ultramarine's right flank

On the Ultramarine left flank armored companies remain in reserve, while Devastators defend the city, next to the Administration Center.

A battalion of Ultramarine Terminators are hunkered down in the Administration Center.

Shields up! Ion Cannon in rotating turret has two plasma shields up! Eldar Falcon Grav tanks loaded with Guardians in the distance.

In reserve, the Space Marines have a 3 company Assault Battalion.

The warhost of Eldar Exarchs saw some of the bloodiest fighting of the day.

Because the Ion Cannon dominated the terrain of the battlefield the Eldar were determined to destroy it. One of their first cards was the Command & Control card, which allowed them to call in off-board assets. Their first asset was a PLASMA MISSILE (D12+1 combat die)! Just my luck!
So, the Eldar targeted the Ion Cannon with a Plasma Missile. Litko plasma shield disks.

The plasma missile tears into the Ion Cannon knocking out both shields and inflicting one hit on the structure! So much for my lovely Ion Cannon!

View from Mike's position, looking at the Ion Cannon in the middle of the battlefield.

Using the large hill as cover, Brian advances his entire host into striking position...

Mike sends in his Swooping Hawks into the teeth of death!

The Swooping Hawks are smashed and pushed back with heavy loses!

Mike moves his Edlar Grav Tanks and Guardians into position to attack the Ultramarine right flank city.

The Eldar Exachs launch their first assault on the Ion Cannon

Brian's 2 Guardian battalions (6 companies), Striking Scorpions, and Dreadnoughts prepare to attack my left flank

Great shot of the dual between Ultramarine Devastators and Eldar Dreadnoughts and Bright lances.

Devastators start to take some loses, but manage to drive off both the Bright Lance company and Dreadnoughts.

Mike's Exachs launch another assault on the Ion Cannon, but the going is tough as the Ion cannon shatters the elite Eldar warriors.

Exarchs are pushed back with heavy loses, and even lose one company.

Eldar assault the Ultramarine right flank. Guardians disgorge from their grav tanks and begin to hammery the marines.

Exarchs rally and push in again. You can see a second hit marker on the Ion Cannon now.

Brian's Eldar launch their assault led by the Striking Scorpions on the Ultramarine's left hand city! My Ultramarines commit their armor to try and breakup the attack.

Here you can see how badly the Eldar were chewed up. Brian lost nearly every unit attacking my city from Land Raider and Devastator fire. He figured he would lose some, but not everything!

Exachs exact revenge and finally destroy the Ion Cannon, but the cost was tremendous.

My Tactical Marines on the right flank can't stop the Eldar attack and are slowly being pushed back in the city!

Ultramarine off-board artilery strikes a Guardian unit on the right flank!

Space Marines had hot dice and almost annihilated Brian's entire attack. (I rolled great, Brian rolled 1s) Eldar lost 26 of their 35 Morale Points after one turn, while the Marines only lost 7 of 22 morale points. The Eldar players conceded this battle.
The Eldar are going to regroup (bring new troops in and rotate some exhausted troops out) and attack again next week. We are learning a lot about tactics and strategies around off-board support, movement, and general game mechanics. We are still new to FoB so each game is a learning experience.
Subscribe to:
Posts (Atom)